
ISO 13485:2016 · CE Marked under EU MDR 2017/745 · Exporting to 25+ Countries +91 9266125395 [email protected]
Surgeine Healthcare logo
0%

Dried Blood Spot Kits can simplify blood sample collection when a laboratory or research workflow requires small, dried specimens. But a kit is not just a card in a pouch. Its components, instructions, and handling requirements can affect whether a sample is usable. A lancet that feels awkward, a card that absorbs unevenly, or unclear drying directions may create avoidable problems. Small details matter.

Choosing a kit starts with the intended test and the laboratory’s requirements. Check that the collection material is compatible with the assay, and confirm how samples should dry, be stored, and transported. Clear instructions, suitable protective packaging, and accessible technical support are practical signs of a well-designed kit. Ask whether the supplier provides relevant performance information; do not assume that every kit suits every method. That matters.

These seven tips offer a practical way to compare options without treating marketing claims as proof. Consider who will collect the samples, where collection will happen, and whether users need extra guidance. A kit used at home may call for different instructions than one used by trained staff in a clinic. There is no single best choice for every setting, and that can be frustrating. Reviewing compatibility and workflow before ordering may help reduce rejected samples and repeat collections. For clinical use, follow the testing laboratory’s instructions and consult qualified professionals when requirements are unclear.
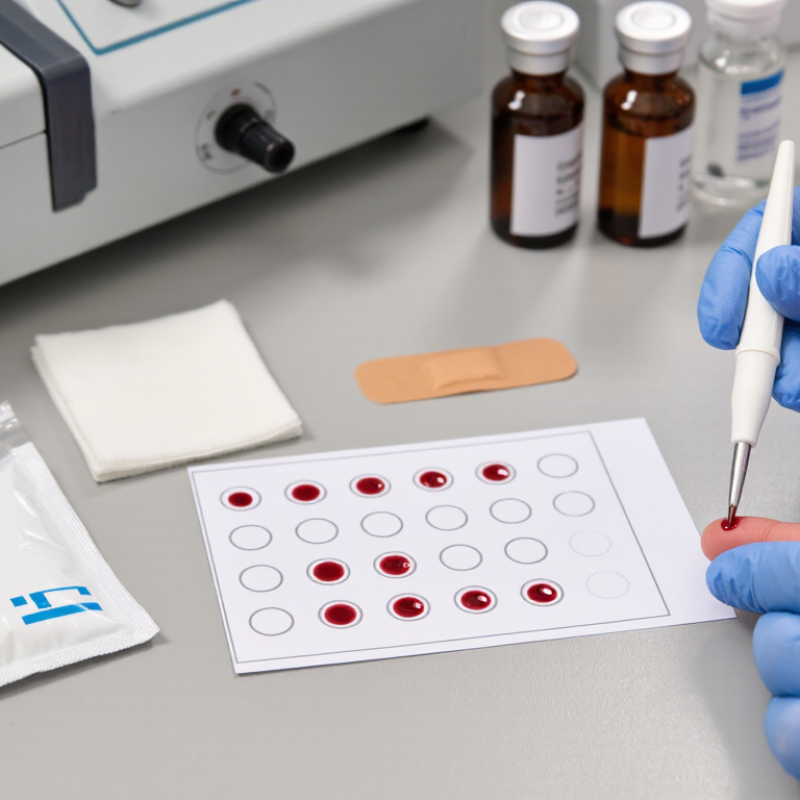
7 Tips for Choosing Dried Blood Spot Kits

Identify the Intended Sample and Testing Requirements

Before selecting a dried blood spot kit, define the specimen and the assay. A newborn-screening panel, a therapeutic drug test, and a molecular assay may require different card materials, spot volumes, or collection instructions. The Clinical and Laboratory Standards Institute’s NBS01 guidance addresses blood collection on filter paper for newborn screening; use the current guidance relevant to your program. CDC’s Newborn Screening Quality Assurance Program supports more than 700 laboratories across 86 countries, reflecting how widely collection and testing workflows can vary. Check that the kit’s card, lancet, and instructions match your laboratory’s validated method.

Then confirm the practical requirements: minimum blood volume, number of spots, punch size, storage temperature, and shipping time. Hematocrit can change how blood spreads through paper and may affect results from a punched sample; a peer-reviewed review by Capiau and colleagues describes this as a key source of quantitative DBS variability. A large-looking spot is not always a reliable spot. Verify whether the assay accepts capillary whole blood, and whether it requires a particular paper type or analyte-specific handling. One detail is easy to miss: some tests need several punches, not just one. I would not assume one kit fits every assay. Document acceptance criteria, rejected-sample rules, and stability limits before ordering, then test the workflow with representative samples.

7 Tips for Choosing Dried Blood Spot Kits — Identify the Intended Sample and Testing Requirements

Use these seven checkpoints to match the kit to the intended whole-blood sample and assay. Each bar marks a requirement to verify; this is a selection checklist, not comparative performance data. Confirm collection, storage, and acceptance criteria with the assay instructions and laboratory.

Check Kit Compatibility With the Assay and Collection Method

A dried blood spot kit must match the assay’s validated sample type, not just its preferred workflow. Check card material, preservatives, punch size, and extraction buffer against the method’s instructions. These details can change recovery, background signal, or analyte stability. A kit that works for one assay may fail another.

The FDA’s 2018 Bioanalytical Method Validation guidance recommends assessing matrix effects across at least six independent matrix sources. This is not a DBS-specific rule, but it offers a useful benchmark when checking assay performance across donors. Ask whether validation covered the intended card and collection method. Also confirm that the assay has been tested with the expected sample volume and hematocrit range. Small differences matter.

Collection method matters, too. Capillary drops and venous blood applied to a card may spread differently, affecting spot area and punch consistency. Confirm whether the protocol allows direct finger-stick collection, anticoagulated blood, or both. Follow the kit’s drying and storage instructions; a damp card can compromise results. The CLSI guidance for dried blood spot collection is a practical reference, but it cannot replace assay-specific validation. A clean-looking spot is reassuring, not proof.

7 Tips for Choosing Dried Blood Spot Kits - Check Kit Compatibility With the Assay and Collection Method

Tip What to Check Why It Matters Practical Action
1. Match the card to the assay Confirm that the collection-card material has been evaluated for the target analyte and analytical method. Card materials and additives can affect analyte recovery, background signal, and assay performance. Check validation data for the specific analyte, card type, extraction procedure, and assay platform.
2. Choose a compatible collection method Determine whether the protocol uses capillary or venous blood, and whether blood is applied directly or through a transfer device. Collection technique can influence spot size, sample distribution, and the amount of blood represented in a punch. Use a kit and instructions validated for the intended source and collection workflow; do not assume methods are interchangeable.
3. Verify the required sample volume Check the validated volume per spot, number of spots, and the volume needed for repeats or confirmatory testing. Insufficient or inconsistent sample volume can reduce the usable sample area and compromise testing. Follow the kit’s validated application instructions and confirm that the available sample meets assay requirements.
4. Account for hematocrit effects Ask whether the assay is affected by hematocrit and whether the kit or workflow uses a volumetric collection approach. Hematocrit can change how blood spreads on a card, which may affect the blood volume contained in a fixed-size punch. Review hematocrit studies and consider a validated volumetric device when consistent blood-volume measurement is important.
5. Check punch size and sample layout Compare the card’s marked collection area and punch diameter with the assay’s extraction and sample-input requirements. The punched area determines how much dried sample enters extraction; punches from different regions may not contain equivalent amounts. Use the validated punch location and size, and ensure the spot fully covers the designated area as instructed.
6. Confirm drying and storage requirements Review drying conditions, packaging, humidity control, temperature, and any analyte-specific storage limits. Moisture, heat, and storage duration can affect analyte stability and increase the risk of sample degradation or contamination. Follow the validated protocol for drying and packaging; use desiccant or protective packaging when required by that protocol.
7. Review workflow and quality controls Assess labeling, transport, sample tracking, blank controls, and the availability of suitable quality-control materials. A kit must work across the full process—from collection through extraction and analysis—not just at the point of collection. Pilot the complete workflow and document acceptance criteria before routine use.

Note: Kit suitability is assay- and analyte-specific. Follow validated laboratory procedures and the kit instructions for use.

Evaluate Card Materials, Lancets, and Collection Instructions

Card material affects how blood spreads and dries, so check that the card is validated for the intended test. A consistent cellulose surface can help produce even spots, but appearance alone cannot confirm suitability. Compare the card’s absorbency, printed fill circles, and compatibility with the laboratory’s analysis method. Small details matter. A card that curls or smears easily may be harder to handle, especially for first-time users.

Lancets should provide the sample volume specified by the kit without making collection unnecessarily difficult. Check the device’s depth and activation method, and make sure users can operate it with one hand if needed. Collection instructions should show clear handwashing, drying, and fingertip preparation steps. They should explain how to fill each spot, avoid touching the paper, and let cards dry fully before packaging. Follow the kit’s own directions for storage and shipping; generic advice may not fit every test. It is easy to assume a simple diagram is enough, but a close-up image of a properly filled spot can prevent confusion. Not always. Instructions should also say what to do when a spot is incomplete or smeared, rather than leaving users to guess.

Review Sample Drying, Storage, and Shipping Requirements

Dried blood spot quality depends on what happens after collection. CDC newborn-screening guidance recommends air-drying cards horizontally for at least three hours at room temperature. Keep them away from direct sunlight, heaters, and dust. Do not stack cards while wet; even a small damp area can transfer blood or encourage uneven drying. I still find drying time easy to underestimate when a shipment is waiting.

Tip: Confirm the kit’s drying instructions match your workflow. Add a timer and a clean, level drying rack. Once fully dry, place each card in its own protective pouch with desiccant; use a humidity indicator when the protocol requires one. Record collection and packaging times, since a clear timeline helps staff investigate unexpected results.

Tip: Check storage and shipping limits before selecting a kit. CDC guidance emphasizes protecting specimens from moisture and keeping collection materials dry; laboratory protocols may set specific temperature and transit windows for each analyte. Choose packaging that prevents bending and keeps cards separated from cold packs or wet ice. Ship early in the week when possible, and document delays or exposure to heat. These details sound fussy. They matter. A kit with convenient collection materials may still be a poor fit if its drying area, storage space, or courier schedule cannot meet the stated requirements.

Compare Quality Validation, Regulatory Status, and Support

7 Tips for Choosing Dried Blood Spot Kits

A kit’s appearance can be reassuring, but it does not prove reliable performance. Ask for validation data covering the intended sample volume, collection surface, drying conditions, and analytes. Check whether testing included real-world variations, such as uneven drops or warm, humid transport. Look for clear acceptance criteria and documented results, not just claims of accuracy. Small details matter.

Tips: Compare lot-to-lot consistency. Confirm that instructions explain how to fill each spot and dry the card. Check whether packaging protects samples from moisture. Ask how stability was tested, and under which storage conditions. Validation may not match your workflow perfectly; note the gaps.

Review regulatory status for the kit’s intended use and the regions where it will be used. Requirements vary, so verify current documentation with qualified regulatory staff rather than relying on a sales summary. Ask what the status covers: the collection device, the test method, or both. They are not always the same. Then assess support. Can the supplier provide training, troubleshooting steps, and timely answers about rejected samples or shipping delays? Request sample instructions and escalation contacts before adopting a kit. Try a small pilot with your own staff. Their feedback may reveal confusing steps that a polished document misses.

FAQS

How do I choose a dried blood spot kit?

Match the card, lancet, and instructions to your laboratory’s validated assay. One kit may not suit every test.

What requirements should I check before ordering?

Confirm minimum blood volume, spot count, punch size, storage temperature, and shipping time. Write down sample rejection rules too.

Does a large blood spot guarantee a good sample?

No. Blood spread can vary with hematocrit, affecting results from punched samples. Looks can mislead.

Can every assay use capillary whole blood?

No. Check whether the method accepts it and requires a specific paper type or analyte-specific handling.

How long should cards dry?

Follow the applicable protocol. One common recommendation is at least three hours at room temperature, with cards lying flat.

Where should cards dry?

Use a clean, level rack away from sunlight, heaters, and dust. Do not stack damp cards.

How should dried cards be packed?

Put each card in its own protective pouch with desiccant. Add a humidity indicator when the protocol requires one.

What helps protect cards during shipping?

Keep cards dry, flat, and separate from cold packs or wet ice. Record collection and packing times, and note delays or heat exposure. I might still overlook the courier schedule. It matters.

Conclusion

Choosing Dried Blood Spot Kits starts with defining the intended sample and testing requirements. Consider the sample volume, target analytes, and any handling needs associated with the planned analysis. Confirm that the kit’s collection method and materials are compatible with the assay, since differences in collection devices or card specifications may affect sample quality and test performance.

Review the card material, lancet design, and clarity of the collection instructions to ensure the process is practical for the intended users. Check requirements for drying, storage, and shipping, including how samples should be protected from moisture and temperature changes. Finally, compare available quality validation information, relevant regulatory status, and the level of technical support provided. A careful review of these factors can help identify a kit that suits both laboratory needs and the full sample-collection workflow.

Charlotte

Charlotte

Charlotte is a professional marketing specialist dedicated to helping businesses understand products, markets, and customer needs through clear, practical, and insightful communication. With a strong understanding of the company’s products, services, and industry applications, she transforms......